A photo wall calendar looks like a simple thing to order, and then you get to the upload screen and it asks for a size, a paper stock, a binding style, a start month and files at a resolution you may not have. Get those choices right and the finished calendar is crisp, hangs flat and lasts the whole year on the wall. Get them wrong and the images print soft, the pages curl or the whole thing feels flimsy. This is a walkthrough of every decision, in the order a printer will ask you to make it.
Choose the size and how it hangs
Wall calendars come in a handful of standard shapes, and the size you pick drives everything downstream, from how much photo resolution you need to what it costs. The common options are 8.5 by 11 inches (portrait), 11 by 8.5 (landscape), 12 by 9, and a 12 by 12 square, with smaller 6 by 6 and 5.5 by 8.5 formats for desk or mini calendars. Landscape is the default for photography because most cameras shoot wide and a horizontal frame fills the top panel without heavy cropping. Remember that a calendar hangs open: an 11 by 8.5 calendar occupies about 11 inches wide and roughly 17 inches tall on the wall once the photo page and the grid page are both showing. Measure the spot you are hanging it before you commit to the biggest size.
Get your photos to print resolution
This is where most disappointing calendars go wrong. Screens display at 72 pixels per inch, but print needs 300 DPI to look sharp, so an image that looks fine on your phone can print blurry when stretched across a 12-inch page. The math is simple: multiply the printed size in inches by 300 to get the pixel dimensions you need, then add about an eighth of an inch of bleed on every edge if the photo runs to the paper’s edge. A full-bleed 12 by 12 square needs roughly a 13.5-megapixel file; the landscape sizes need closer to 9 or 10.
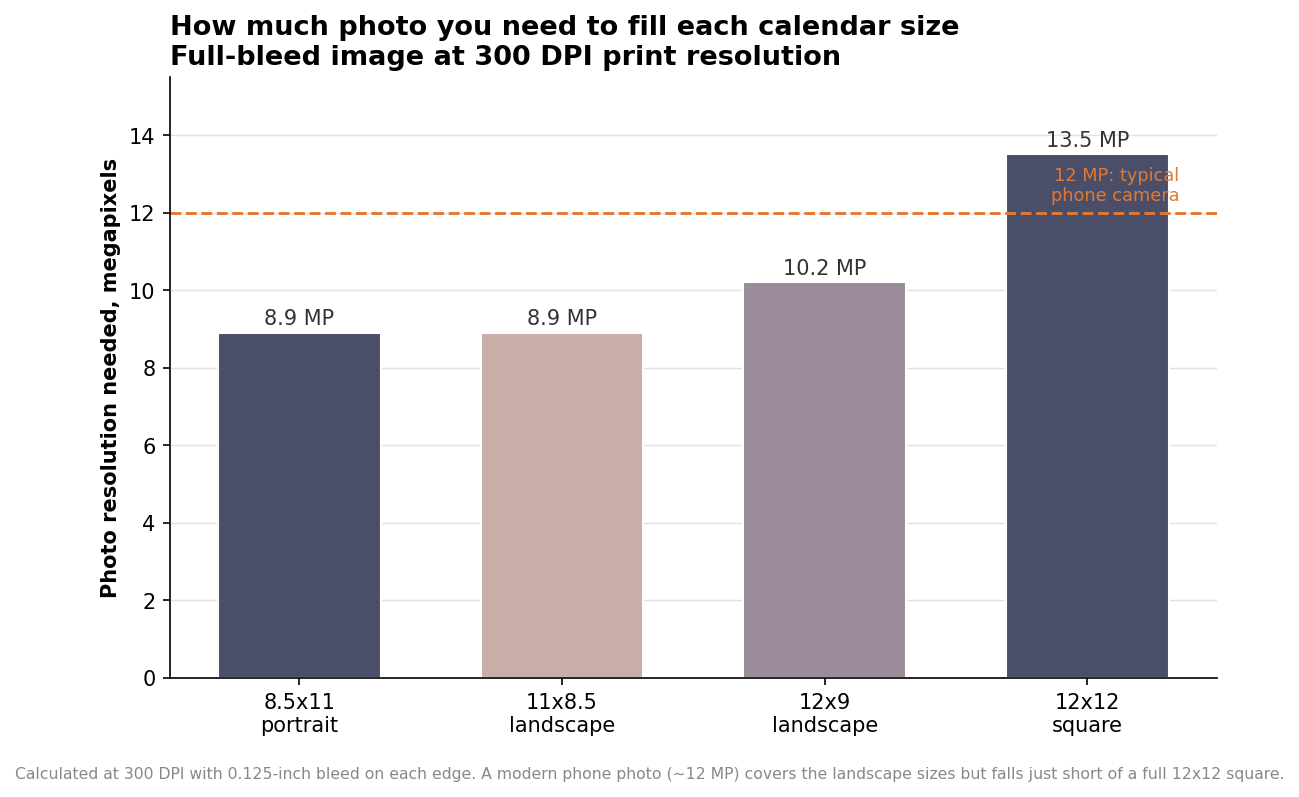
A modern smartphone shooting at around 12 megapixels covers the landscape formats comfortably but falls a little short of a full-bleed square, so crop tightly or drop the square down a size if your source images are phone photos. Two habits save the most grief: pull images at full resolution rather than a shrunken version pulled from social media or a messaging app, and avoid enlarging a small crop to fit, since upscaling invents pixels and softens the result. If a file is borderline, most printers will flag it during preflight, but do not count on the software catching everything.
Pick paper and binding to match the use
Inside pages typically run from 70-pound uncoated stock up to a heavier 100-pound gloss or matte, with the cover on 80-pound gloss or a 10-point cardstock. Gloss makes photos pop with more contrast and saturation, which suits vivid landscapes and product shots; matte is easier to write on and cuts glare under overhead light, which matters if people actually mark dates on it. Heavier inside stock resists curling and shows less of the image printed on the reverse page. For binding you have three realistic choices: saddle-stitch, where pages are folded and stapled, is the most affordable; wire-O, a double-loop metal binding along the top, looks the most professional and lets pages flip cleanly; and plastic coil sits between them and lays completely flat. All three are drilled with a hanging hole, and you can usually pick the hole diameter to match your hook.
Decide the page count and the grid
A standard 12-month calendar is built from about 24 to 28 pages once you count the cover; a 14- or 16-month version adds pages so it can start a few months early, which is useful if you are selling or gifting calendars mid-year. If you print saddle-stitched, the page count has to land on a multiple of four, so the printer may add a notes page or a bonus photo to make the signatures work. Beyond the month count, look at the date grid itself: confirm the calendar starts on the month you want, that the week begins on Sunday or Monday to match your audience, and that there is enough white space in each day cell to write in. If the calendar is promotional, this is where a company logo, contact line or seasonal note usually goes, printed in the margin below the grid rather than over the dates.
Understand what quantity does to the price
Calendar printing has a steep quantity curve because the setup, plate or digital press configuration, proofing and binding, is largely fixed regardless of how many you run. Order ten and you might pay around $18 each; order a hundred of the same 11 by 8.5 twelve-month calendar and the unit price drops to roughly $6.50; at 500 it can fall near $3, and at a thousand closer to $2.40. Those figures are for a standard full-color saddle-stitched calendar and are indicative rather than a specific quote, but the shape holds across printers.
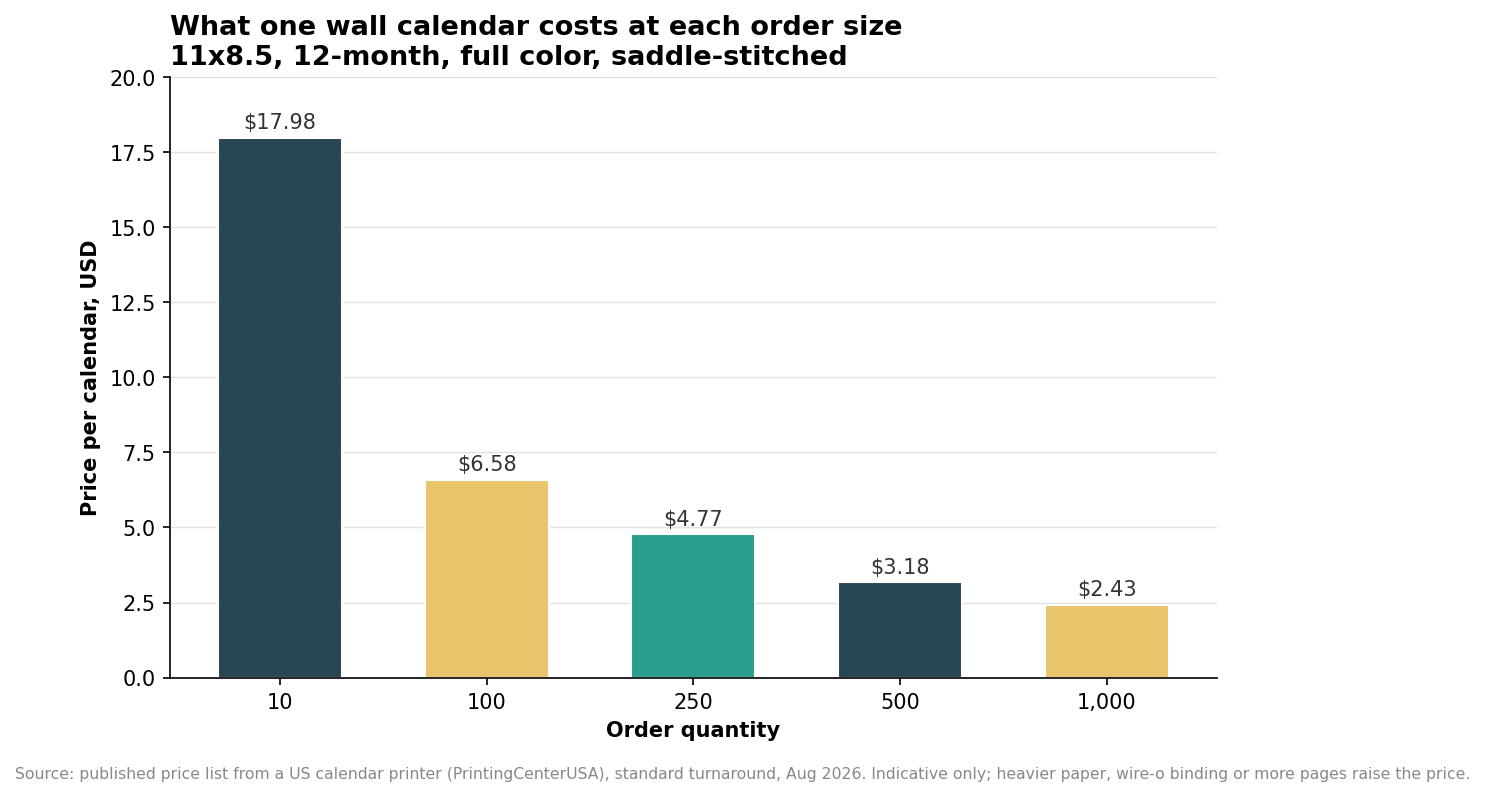
The practical takeaway is that small personal orders are expensive per piece, so if you are making calendars for a family or a small group, ordering a slightly larger batch and sharing the cost lowers everyone’s price. Heavier paper, wire-O binding and extra pages each add to the per-unit figure, so price a couple of specification combinations before deciding; the jump from saddle-stitch to wire-O, or from 80-pound to 100-pound stock, is often small at higher volumes and worth it for a calendar meant to last.
Before you approve the proof
Production is fast once art is approved, commonly one to six business days plus shipping, with rush options that turn around in about two days, so the real timeline is dominated by how long you take to finalize files. Give yourself a buffer if you need calendars in hand by January. Check the digital proof for four things: every image is sharp at full size, the correct year and start month are set, holidays and any personal dates are spelled and placed correctly, and nothing important sits in the bleed zone that will be trimmed off. A few minutes on the proof prevents a box of calendars with the wrong year, which is the one printing mistake you cannot use up.